

[Part 1] What is SHOPIFY's metallic? Explanation with procedure up to how to implement it with no code
今回の記事ではShopifyで利用できる「メタオブジェクト」について、実際の使い方例を用いて解説していきます!
- Shopifyのメタオブジェクトとは?
- なにができるの?
- メタフィールドとなにが違うの?
- 気になっているけど難しそうで手が出せない…
- コーディングの知識がないからオブジェクトについてよく分らない…
そんな方はぜひこの記事を読んで実践してみてくださいね。
Table of content
Please also see the second story

What is Metao Budget?
Shopifyの公式ヘルプページを読むと、下記のような記載があります。
メタオブジェクトを使用すると、ストアに構造化された情報を追加し、保存できます。例えば、機能、仕様、サイズチャートなどの商品情報を保存することができます。
メタオブジェクトには2つの主要な構成要素があります。
定義:オブジェクトの構造を定義する複数のフィールドです。管理画面の [設定] > [カスタムデータ] で管理できます。
エントリー:メタオブジェクトのコンテンツまたはデータです。エントリーは、管理画面の [コンテンツ] > [メタオブジェクト] で作成および管理されます。
https://help.shopify.com/ja/manual/custom-data/metaobjects
………よく分らないですよね…
視覚的にメタオブジェクトを表してみると下記のようなものになります


Objects defined as "branches" can set fields such as address, phone number, and business hours.
Objects defined as "people" can set fields such as names, gender, and nationality.
Did you become able to imagine a metao must -see?
At this stage, it's okay if you still know "blurred".
Differences between metafields and metao -do guts
Shopifyにストアをお持ちの方、Shopifyについて調べている方は「メタフィールド」という言葉を聞いたことがあるかもしれません。
今回の記事のテーマ「メタオブジェクト」との違いについて簡単にご説明します。
メタフィールドは、 Shopifyにすでに存在しているモノ(オブジェクト)に対して追加データを保存するためのもの です。
Shopifyにすでに存在しているモノ(オブジェクト)とは、商品やページ、顧客などを指します。
例えば、商品というモノ(オブジェクト)に対しShopifyの標準商品登録画面では定義ができないようなサイズや内容物の詳細のことを指します。
対して
メタオブジェクトは モノ(オブジェクト)そのもの であり、モノの中に自由にフィールドを設定することができます。
以下の記事もおすすめ!
What can you do using a metao must -see
メタオブジェクトについてざっくりご説明しましたが、実際のShopifyストアではどういった場面で使用できるのでしょうか
Example ① Store information
「メタオブジェクトとは」で例に挙げた支店のオブジェクトと同じように、店舗のオブジェクトを作成し、それぞれに店舗名・住所・電話番号・営業時間などのフィールドを設定することができます。
Example ② FAQ
Example ③ Producer and designer
手作り商品の制作者、アパレルやアクセサリーのデザイナーなどの紹介にもメタオブジェクトを使用することができます。
ショップで取り扱っている商品の制作者やデザイナーのページを作成して顧客にアプローチすることができます。
例えば、手作りの雑貨を販売するストアを持っているとします。
「制作者」というオブジェクトがあり、その中に名前・紹介文・画像などを定義します。
その後「Aさん」「Bさん」「Cさん」などの情報をエントリーとして登録。
制作者一覧ページを作成し表示するとともに、制作者個別の紹介ページを作成することも可能です。
このあとのセクションからは、工芸品の制作者一覧を想定し実際に情報の定義や入力を行うところからShopifyのフロント(お客様から見える画面)に反映させるまで、ステップバイステップでご紹介していきます!
Create and display a list of producers using the SHOPIFY metropolic function
前のセクションでどんなことができるかご説明しましたが文字だけだと少し分かりづらいかもしれないため、ここからは手順を踏んでご紹介していきます。
What was realized from now on
Define the creator's metallorect
Add an entry (each individual) to the creator's metallorect
Create an introduction page for the creator entry (individual)
Create a page for the creator list
The procedure will be a little more, but we will explain each one with a screenshot on the screen, so please try it on your screen together.
Definition of metaodo must -do and add entry
Step ① Define a metao must -go
作業するページ: 設定→カスタムデータ
下にスクロールし「最初のメタオブジェクトを定義する」の項目で「定義を追加する」をクリック

Add name and explanation. It is OK with easy -to -understand ones.
The name may be Japanese, but the type below it must be the alphabet. If you want to set the name in Japanese, rewrite the type "edit" to the name of the alphabet.
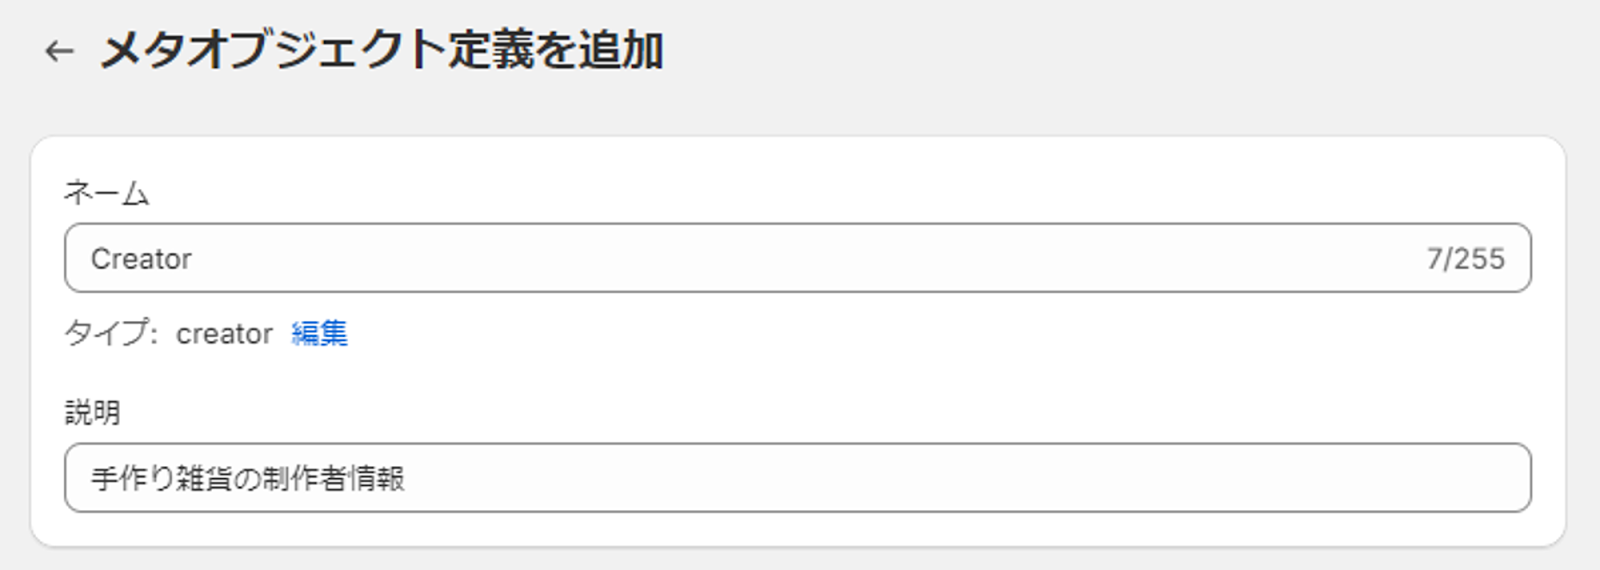
Next, add your favorite field from "Add Field".
This time, I want to define the name of the creator, so I will select a "single line text".

There are various options, but it is OK if only the name can be entered.

In the same procedure, INTRODUCTION introduction (multiple lines text), images images (files), Product products (products) have been defined.

完了したら「保存」をクリックします。
Step ② Add an entry
作業するページ: Shopify管理画面→左メニュー→コンテンツ→メタオブジェクト
先ほど作成した「Creator」を選択し、次の画面で「エントリーを追加」ボタンをクリックします。

エントリー追加の画面に切り替わったら先ほど定義を作成した際に設定した名前・紹介文・画像を設定します。

Display the created metao must -do
From now on, we will explain the procedure to display the set metao -part on the page.
Metao Bject entry individual page
先ほど「John Doe」さんという制作者のメタオブジェクトエントリーを作成しました。このセクションではJohn Doeさんのページを作成してみます。
手順① ページテンプレートを作成する
作業するページ: Shopify管理画面→左メニュー→オンラインショップ→利用中テーマの「カスタマイズ」
情報を表示するためにはそのページのテンプレートが必要です。Shopifyのテーマカスタマイザーから設定しましょう。
画面上部「ホームページ」と記載のある個所をクリックし、表示された中から「メタオブジェクトのテンプレートを作成する」を選択します。その後の画面で先ほど作成したメタオブジェクト「Creator」を選択します。
次に表示される画面で「テンプレートを作成」をクリックします。
(この画面ではSEOに関連するページのタイトルやディスクリプション、URLの設定を行うことができます。今回詳細設定については割愛します)

手順② テンプレートにセクションを挿入する
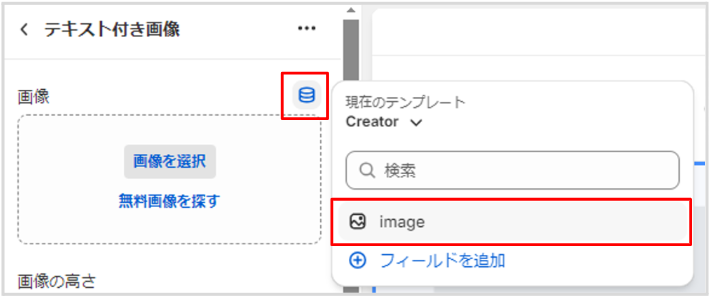
Select the section you want to display. This time, I selected the image with text and inserted it.

手順③ 表示するメタオブジェクトを指定する
Select the headline of the image section with text, click the icon (such as the server) icon "Add Dynamic Sauce", and select "Metao Bugout" from the displayed.

Then the system will automatically take the entry content from the metao -do gect and display it!
In the same procedure, set the introduction to the text.

In the case of the image, select "Image with text", click a similar (server -like) icon at the right end of the image column, and select Image.
Once you've finished selecting everything, it's like this!

別の制作者の表示を見てみる
Did you try so far and don't feel a little more as a man -hours to display a page of one creator? Creating a blank template and adding images, names, and introductions is enough to work ...?
The advantage of creating a template for a metaodo must -do is not just creating a page for one person.
As long as the information is registered as "entry", it is possible to display it without creating an individual page one by one!
Press "Change" to the right of the preview and change to another entry. This time, I have already added information about EMILY.

すると、Emilyさんの情報がJohnさんと同じように表示されました!もちろんこの表示は管理画面からだけでなく、お客様からも確認ができます。
「ハンドル」としてURLがすでに割り振られているため、 これ以上の面倒な設定は必要ありません。

Metao Bject entry list page
手順① カスタマイザでテンプレートを作成する
作業するページ: Shopify管理画面→左メニュー→オンラインストア→カスタマイズ
現在ホームページとなっている部分でページを選択、次に「テンプレートを作成する」をクリック
次の画面でテンプレートの名前を入力し「テンプレートを作成する」をクリック


手順② 空白の「ページ」を作成する
作業するページ: Shopify管理画面→左メニュー→オンラインストア→ページ
「ページを追加」からタイトルを入力、テーマテンプレートの欄で手順①で作成したテンプレートを選択して保存します。

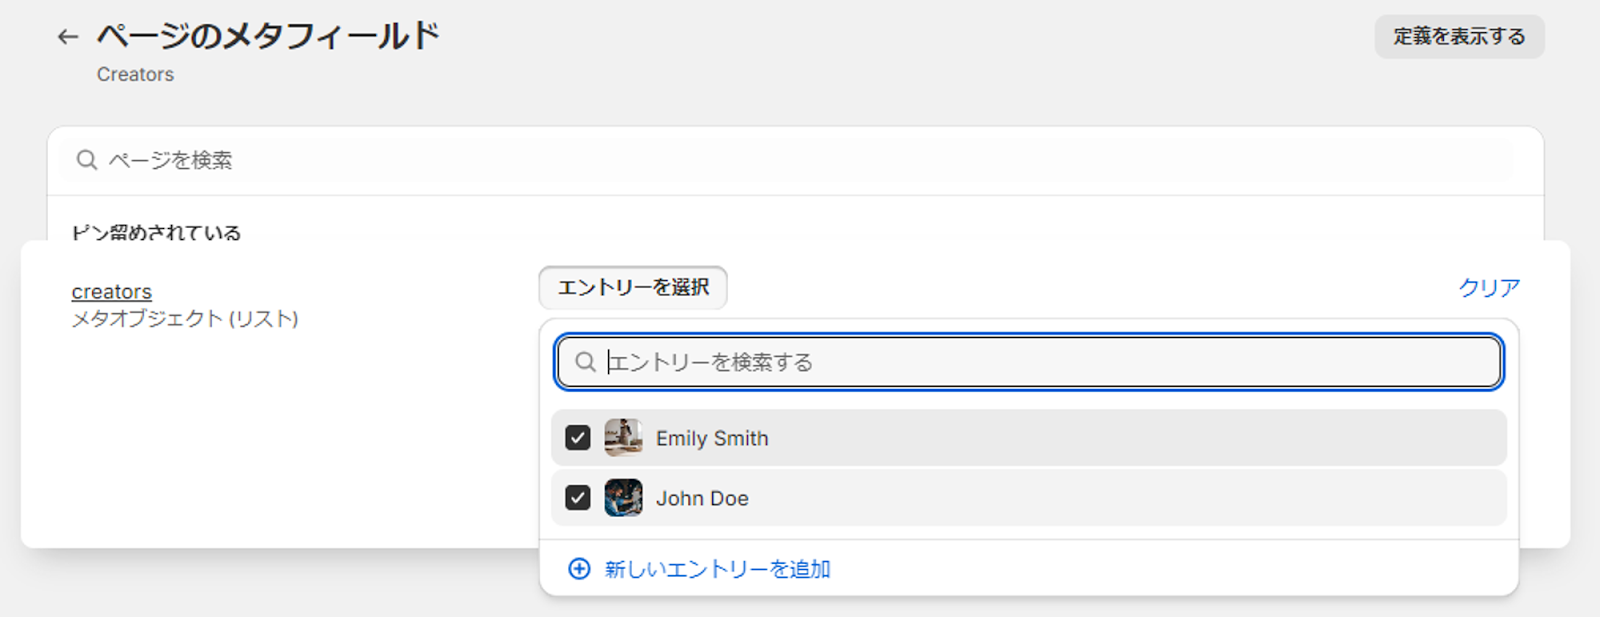
手順③ ページにページメタフィールドを設定する
作業するページ: Shopify設定→カスタムデータ→ページ
作業するページが行ったり来たりと、少し複雑になってきましたね。ですが、今までの作業もこの作業も一度設定するだけで後の更新では作業の必要がないので安心してください。
設定のカスタムデータからページを選択し、名前を入力
「タイプを選択する」からメタオブジェクトを選択し、さらに「エントリーのリスト」を選択します。

From "Select Entry", check everything (or any) entry and save.
手順④ カスタマイザでページにメタフィールドを紐づける
作業するページ: Shopify管理画面→左メニュー→オンラインストア→カスタマイズ
メタオブジェクト一覧表示の最終ステップです!
カスタマイズ画面、手順②で作成したcreatorsのテンプレートを表示させます。

Add the "multiple columns" section and select the first Row.

Click "Connect Dynamic Source" and select Creators.

Then!
The information of JOHN and EMILY, added to the Metao Bugout called Creator, was displayed at once!
The button link is also automatically set to the individual page of each creator.
After that, change the style freely, adjust text and headlines.

Thank you for your hard work! !
summary
いかがでしたでしょうか。最初は少し大変だと感じられたかもしれません。
しかし、一度今回の設定を行っておけば、制作者が増えたとしてもメタオブジェクトのメタオブジェクトのエントリーを追加するだけで自動的に個別ページが生成され、制作者一覧にも名前や写真が表示されるようになります。
今回は手作り商品の制作者という例をご紹介しましたが、メタオブジェクトを使って何ができるのかで紹介したように店舗や支店の一覧を作成したり、FAQを作成して自動表示させたりなど使い方はまだまだたくさん!
皆さんのビジネスに合ったメタオブジェクトの使い方を探してみてくださいね。
今回はノーコードでの使い方をご紹介しましたが、それでもステップが多いので自社では対応できる人がいない…コード編集でもっとカスタマイズ性の高いストアにしたい!などの場合はぜひGO RIDEへお問い合わせください。
以下の記事もおすすめ!


Popular articles


![[New App Block Available] GO SUB | Subscription Update](http://goriderep.com/cdn/shop/articles/new-app-widget-styles-added.jpg?v=1785147096&width=600)
![[Delivery Date-Based Order Creation and Skip Restrictions] GO SUB | Subscription Update](http://goriderep.com/cdn/shop/articles/skip-limit-and-a-lot-more_47947124-cf95-422c-ac11-56e167470724.jpg?v=1783643998&width=600)


